
Hello friends, I hope you are all doing great! A friend of mine wanted me to teach him set Excel password on his documents since most of his business transactions are prepared and saved in it. I then decided to share with you the processes to go through to protect Excel workbook and keep your data private from unwanted access by friends or even colleagues at work.
Microsoft Excel is one of the productivity packages that can be found in the Microsoft Office Suite software. It is used for performing calculations, keeping records as well as charting graphs. Excel worksheet protection is something simple everybody can do.
To encrypt Excel file with password, let’s do a quick overview of what a password is. A password is a secret character combination (alphabets, numbers, and symbols) put together and used to protect a document. When a document is saved with a password, access to the file i.e. viewing and editing becomes the sole prerogative of the owner.
To encrypt Excel file with password, let’s do a quick overview of what a password is. A password is a secret character combination (alphabets, numbers, and symbols) put together and used to protect a document. When a document is saved with a password, access to the file i.e. viewing and editing becomes the sole prerogative of the owner.
It is, therefore, important that whenever you create a new workbook that is going to contain confidential information, you secure it with a password in Excel. I am going to take you through the steps to how to create Excel password protect document.
The following steps can be used to password protect the workbook.
MS Office 2007
- Click on the Office button
- Click on Prepare and choose Encrypt with Password from the options
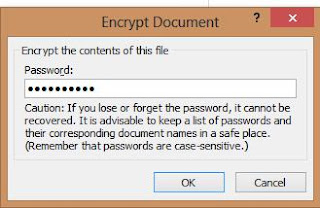
- Type your desired password in text field of the Encrypt Document dialog box
- Retype password in the Confirm Password dialog box
- Click OK to set password
MS Office 2010 & 2013
- Click on File
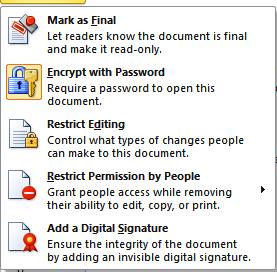
- Under the Info tab, click on the Protect Document dropdown button in the Permissions group
- Select the second option Encrypt with Password from the list
- Type your desired password in text field of the Encrypt Document dialog box
- Retype password in the Confirm Password dialog box
- Click OK to set password
Done!!!
To open password protected excel file, you are going to see something like this. Now anyone who tries to access the document has to bypass the password since it’s now protected.

Note: You can also use these options for additional protection
Mark as Final – Users of the document will know it’s final and will be marked as Read-Only so no changes can be made again. Unless you revert the changes.
Restrict Editing – You can also control the type of changes users can make to the document
Restrict Permission by People - You grant access to some users but remove their ability to edit, copy or print the document.
CAUTION: Use a simple and standard but easy to remember passwords to protect your documents because if you loose it, it can never be recovered unless a recovery software is employed. Make sure to write and keep it somewhere safe.
I hope you found this tutorial helpful. Let’s get interactive by dropping your questions and suggestions in the comments box below. Enjoy!!!
Comments
Post a Comment